At the start of the year I made a little promise to myself to see more bands live. I love live music, the atmosphere, the crowd, the sing-alongs. 2011 had the tough target of 1 to beat. I kicked off with Professor Green at Leeds Academy in April. Rap is one of my guilty pleasures and I became a bit obsessed with Pro. The gig was great, loads of energy, D.P.M.O was my highlight of the evening.
A week later and it was Alkaline Trio at Middlesbrough Empire. What a cute venue! Trio were supported by Dave Hause who was awesome. I rarely like a support act but I loved him! Trio were great as always, playing my favourite songs and some that I had forgotten how much I liked.
NOFX at Newcastle. The thing that got me here was Less than Jake. I didn't have anyone to go with so wasn't going to bother, but then I couldn't just sit about knowing that they were playing 45mins away from me! So I went on a little adventure and it was so worth it. Less than Jake were their usual brilliant selves. Always full of energy, I can't help but be happy at an LTJ gig. Great selection of songs, great singalongs. NOFX were ok. There was some moments of brilliance, but then some moments of boredom. I've seen them twice at Leeds Fest and loved both times, full of laughter so I was a bit confused (and miffed) at the boredom.
Bruce Springsteen. What a legend. No support act and played for 3 hours solid, you can't fault him. There was some new stuff and the obvious songs but then some gems pulled from the massive back catalogue and requests from the crowd. The singalongs to the last run of hit songs was immense.
Green Day at Shepherds Bush. Best. Gig. Ever. No arguments. No exaggeration. Probably the most expensive gig I've been to if you factor in travel and hotel but so worth it! The week before was spent waiting for the announcement of a secret show and then there was the stress of getting a ticket and organising everything then waiting in the queue for what felt like forever, anticipation levels were high. Getting in to the venue, you could feel the excitement. Sold out in seconds, it was jam packed. I was pretty much in the middle to start with but got to the front-ish after a few songs, it was hot, sweaty and mental. There was a good mix of new songs, old-ish songs and really old songs. I love that this was a gig and not a massive concert, nothing fancy just the guys having fun. Highlights were Billie Joe's dancing, Going to Pasalacqua played by a guy from the crowd and King for a Day. LOVE that song especially live, what's not to love about a saxophone/kazoo off?
The Road to Warped ended my gig adventures. Manchester with LTJ headlining then Leeds with NFG at the top spot. Both epic. I really enjoyed NFG, I wouldn't class myself as a fan, but I enjoyed them both nights. Leeds marked 16 times seeing Less than Jake and they honestly never get old. The dodgy jokes, random stuff happening on stage, the sing along to Plastic Cup Politics, I'd watch it every night if I could.
2013 kicks off with The Gaslight Anthem then Green Day. Bring it on.
Sunday, 30 December 2012
Sunday, 16 December 2012
Candle Making
Jam Jar 2 - the Return of the Jam Jar
My next jam jar idea was as a tea light holder, just the right size to pop in a tealight? No. Too small. No problem, I can just make one to fit.
I am bidding on a candle making kit from eBay but I am slightly impatient so I asked Jilly if she had anything I could melt. She has a secret stash of bargain candles from car boots and jumble sales but would only let me have two!

Chop up your candles to make it easier to melt. Try to get all the wick out before you go to melt it.
 Pop the wax in a double boiler. I fashioned mine from an old pan and a Golden Syrup tin that I found lying around - its a bit of a dangerous weapon but it did a good job. You should aim to warm the wax until it's all melted, dont let it boil. It takes a bit of time so while you are waiting sort out the candle wicks.
I had bought mine from eBay a few months ago with good intentions. I used sticky dots to keep them in the centre of the jar. I spray painted the jam jars using a chrome effect spray paint to make them a bit prettier.
 Wax all melted? Pour it in. The syrup tin bent easily to make a little spout. If you put the containers on some grease proof paper you can scrape of any spilt wax to melt again.
Leave to set. You should keep a bit of wax back to top up the candles if the wax sets short, mine ended up with a big dip in the centre. As you can see, my two scrappy candles only just did two jam jars (I then went and found another random one, hence the colour change!)
Light and enjoy!
Monday, 3 December 2012
Jam Jar City
We go through loads of mini jam jars at work and every now and then have been asked to save them for random reasons. Recently, I asked everyone to collect them so I could use them to keep seed beads in and ended up with a giant shopping bag full! Really didn't need that many but it seems a shame to just chuck them in the recycling now so I have set myself a challenge of using them.
Jam Jar Use 1 - Bead Storage.
They are clear. You can see what's inside.
They have a lid. The insides won't spill. You can use it as a little tray.
They are quite small. Good for tiny beads.
They can stack.
Easy start.

Jam Jar Use 1 - Bead Storage.
They are clear. You can see what's inside.
They have a lid. The insides won't spill. You can use it as a little tray.
They are quite small. Good for tiny beads.
They can stack.
Easy start.
Saturday, 1 December 2012
Silversmithing - Christmas rest.
We have finished our first term of silversmithing and I have loved it! My stone set ring is complete and I now have a new shiny, swirly ring. My only worry is that I might run out of fingers for all theses rings!
The swirl ring was adapted from a book. I wanted something quick to do so it would be complete before the last lesson so this was simple enough. We didn't have any wire of the thickness the book suggested so I improvised and soldered two lengths together to get a wider piece. I then filed both ends slightly as this apparently helps to get a better spiral. Then using round nose pliers I bent the ends round and then shaped the ring on a mandrel. I then bent the spirals into position and soldered the join. Out came the mandrel to shape the ring again, a few tweaks of my spirals and then I got to use a polishing machine and jeweller's rouge which made my ring go super shiny and was so much quicker and easier than polishing by hand!
Over Christmas I need to get some ideas together for my next projects, the world is my silver oyster!
Friday, 2 November 2012
Silversmithing - half term break
For the last 6 weeks I’ve been doing a beginners Silversmithing
course on a Friday evening. We are on half term at the moment then we have
another 4 weeks where we can start working on a project of our own design or
from one of the many books our teacher brings along. For these first 6 weeks we
have covered the basics and worked on 3 small projects to get us going. Our first
lesson was spent making a basic plain ring band. We had to measure our silver and cut using a
piercing saw, it’s a really fine saw
blade that doesn’t look anywhere near as scary as the ones I remember from wood
tech but it can cut though metal so I have to remind myself it’s pretty
hardcore! The silver then needs to be filed at both ends to square them off.
This is the most frustrating thing of the whole process, every time I’ve done
it I think the ends are square and the teacher files loads more off. Square
ends are not my strong point.
Then we had to anneal it which involves flames! You basically
heat up the silver with a torch so it glows a dull red colour and then drop it
in an acidic solution called pickle then into water. Annealing makes the silver
a bit softer and easier to shape. Once it’s been in the pickle and water it’s
cold to touch again and ready to work with. (Even after 6 weeks I still don’t really
trust that it will be cold but I’m getting there!) After annealing we shaped
the ring round a mandrel then bent the ends so they touched and the ring was in
a D shape. This was to make it easier to solder, soldering involves more flames
and joins the gap to make a solid shape (so long as your ends are square!) Then
it was back to the mandrel to make it round again. Once the ring was actually
ring shaped it just needed cleaning and polishing then it was ready to wear.
Lesson one done and we walked away with a piece of jewellery, not a very
exciting one but still one that we made!

Lesson two was spent making a knot ring, this was
made with two lengths of wire shaped with a loop at the top and then legs? soldered
together. I really couldn’t see how these would make the ring but with a bit of
pushing and pulling a knot had formed and we nearly had a ring. Lesson 3 was
spent soldering and doing more quality square ends time. Lesson 4 was
soldering, shaping and then after a clean and polish another ring was complete!
We still had some time left at the end of this lesson to start planning our
next project which was learning how to set a stone. Obviously the hardest part
of this was which stone to chose – way too many pretty, shiny things!


Saturday, 29 September 2012
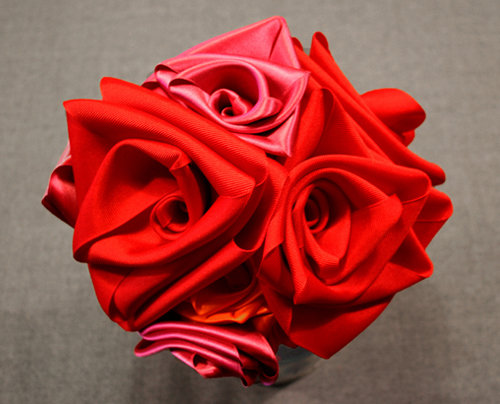
Kate’s Wedding aka How I became an expert on making flowers.
My friend Kate got married last Friday. Earlier in the year
she asked if I could make her a headband, giving me some examples for
inspiration. Without really thinking about it I agreed. It sounded like a great
idea at the time, and it was for a while until I got really stressed out
thinking that I was never going to be able to make one or when I did, that she would be walking down
the aisle looking like a 5 year old had made the thing on her head. But then
about a month ago everything came together, I ended up making four headbands
and a couple of necklaces and bracelets. Kate chose her favourites and a
massive weight was lifted!
 The one she chose:
I spent a lot of time trying out different ways to make
flowers. I have a whole favourite’s folder dedicated to the cause. I also have
a stash of white and ivory flowers as a result of my experimentation, I have no
idea what I’ll be doing with them! Since the examples were mainly fabric, some
with embellishments, I started simple and hit Google with “how to make fabric
flowers” and off I went. My favourite and most successful attempts came from
these sites:
 |
| Simply Vintage Girl |
 |
| BurdaStlye |
 |
| Tea Rose Home |

I absolutely adore this idea, an excellent way to use up all the old zips my Gran collected!
 |
| Creative Art & Design |
Next idea was some beaded flowers. Using this tutorial I
made some nice petals using some pearl beads. I didn’t like that you can see
the wire at the edges, I tried with a thinner wire but that made it harder to
keep the shape. I also tried a simple freeform style. I
threaded loads of seed beads on to some wire and made loads of loops, securing
them at a mid point as I went. I thought these would look good for something
less formal, maybe a hair clip or a small one on a ring but wouldn’t be
suitable for the wedding headband.
 I
also tried some origami and Kanzashi. The origami was the most frustrating
thing I tried to do, it was so hard! I loved the Kanzashi, it was relatively
simple (especially after the origami fiasco) and it looked lovely. I finished
mine with a diamante button in the centre.
I
also tried some origami and Kanzashi. The origami was the most frustrating
thing I tried to do, it was so hard! I loved the Kanzashi, it was relatively
simple (especially after the origami fiasco) and it looked lovely. I finished
mine with a diamante button in the centre.
Once I had drained Google of all the different ideas it
could provide, I set about “designing”. I could have saved myself a lot of
stress if I thought back to my textiles coursework. I would draw a final design
for the project and you could guarantee that what I actually made looked
nothing like that picture. So after several attempts to get an idea down on
paper and have a single design, I bought five tiara bands and went wild. I spent my days off sat at my desk with everything laid out so I could pick and chose, putting different components together and I got four finished peices.
 The one she chose:
This was based on the beaded flowers I tried to do with
wire. I didn’t like the wire showing through so I stitched the beads on to silk and
interfacing and then backed with more silk to cover my messy stitches. I put
the button onto wire and threaded it through the centre of the beads and used
that to attach the stitched flower to a wire flower. I made that simply by
making a loop of beaded wire (checking it would be big enough to show behind
the fabric) twisting the wire, making another loop and twisting at the centre,
and so on so I had the four ‘petals’. I then secured everything to the
headband and then to keep the
flower where I wanted it, I wrapped the band with pearls.
Monday, 10 September 2012
A Little About Me...
My name is Tori.
I like to buy things.
And I like to make things.
As a result of this, I have ended up with alot of crafty things. Beads, ribbons, miles of fabric, buttons, zips, bags of glitter, a soldering iron... Loads of stuff! I started sewing with my Gran and I loved searching through her button boxes and the sewing basket for hidden treasures. This then led to taking Textiles at GCSE and A-Level, where I learnt that I hate the design process (mainly because I can't draw) but I love to crack on, start creating and see where I end up.
I also like magazines... Anybody who knows me can vouch for the fact that I buy too many magazines. But one of these magazines can be credited with starting my favourite crafty passion and that is making jewellery. There was a feature which had a Tatty Devine bracelet, a chain with multi-coloured plectrums and I LOVED IT! I did not love the price, I was about 14 and my pocket money didn't stretch that far... So I thought I'd do a DIY version. I went to Rock Box, a guitar shop, and bought a handfull of plectrums and then to Boyes, a shop that sells everything, and bought some chain, jump rings, pliers, and a clasp.
It was awful.
A really poor attempt. But it sparked something. My mum bought me a memory wire bracelet kit. I bought some tubes of beads and made some earrings. An attempt at a charm bracelet. A book in Textiles class about fabric jewellery. Bead shops discovered. More books bought and borrowed. People started asking if I could make them things for themselves or for gifts. And so it spiralled. I dabbled with Etsy a few years ago, I sold four things! Then life got in the way a bit. I stopped making. I did not stop buying. I love to go shopping in Leeds and always make a stop at Yum Yum Beads, and always make a purchase. I would get all these ideas when I saw the beads, buy them and they would just sit in the spare room waiting to be used.
Then I was asked the classic question:
“What do you want to be doing in 5 years time?”
I want to make jewellery.
“What are you doing to get there?”
Erm... Nothing.
“Why the hell not?!”
Pass.
“If you are serious, I don’t want to be having this same conversation with you in 5 years time.”
So I had a think. I am serious. Let’s do this! At the start of July I did a week long course at the London Jewellery School and it just reinforced that this is something I really want to be doing. So here I am with a cupboard (and several boxes) crammed full of stuff, ready to create. My challenge is to turn the cupboard of stuff in to something amazing.
Stay tuned.
Subscribe to:
Posts (Atom)